Valentine’s Day is a time for love, romance, and, of course, sweet treats. What better way to celebrate than with homemade Valentine’s Day Swirled White Chocolate Candies? These delightful candies are not only visually stunning with their vibrant swirls of color, but they’re also incredibly simple to make and even more enjoyable to eat. The smooth, creamy white chocolate is the perfect base for a variety of fun, festive decorations, and the process of swirling in the bright pinks and reds adds a touch of artistry to your candy-making. Whether you’re crafting these as a gift for a loved one or as a sweet treat for yourself, these swirled chocolates are sure to bring joy to anyone who tastes them. They’re also a great way to add a homemade touch to your Valentine’s Day celebrations and can be customized with your favorite add-ins like sprinkles, edible glitter, or even a hint of sea salt for an unexpected flavor twist. Easy, colorful, and delicious—these candies are a perfect way to show you care this Valentine’s Day.
Why You’ll Love This Recipe
1. Simple to Make
With just a few ingredients and minimal effort, you can create a beautiful and indulgent treat that looks and tastes amazing.
2. Customizable
You can change up the colors, flavors, and decorations to suit your style or make them extra special for your loved ones.
3. No Baking Required
This recipe is perfect for those who want to make homemade treats without the hassle of turning on the oven. It’s quick, easy, and mess-free.
4. Visually Stunning
The swirled effect and bright colors make these candies visually impressive. They’re a great addition to any Valentine’s Day gift basket or party.
5. Perfect for Gifting

These homemade swirled white chocolate candies are ideal for gifting. Pack them in cute boxes or jars, and they’ll make the perfect thoughtful Valentine’s Day gift.
Ingredients
- White chocolate chips or white chocolate bars
- Food coloring (red, pink, or any other colors you like)
- Heart-shaped molds or silicone molds
- Sprinkles (optional)
- Edible glitter (optional)
- Sea salt (optional)
Variations
- Add flavor extracts: For a unique twist, try adding a few drops of flavor extract, such as vanilla, almond, or raspberry, to the melted chocolate before adding color.
- Use dark or milk chocolate: If you prefer a richer chocolate flavor, use dark or milk chocolate instead of white chocolate.
- Add crunchy elements: You can add crushed nuts, pretzels, or even crushed candy canes for some added texture and flavor.
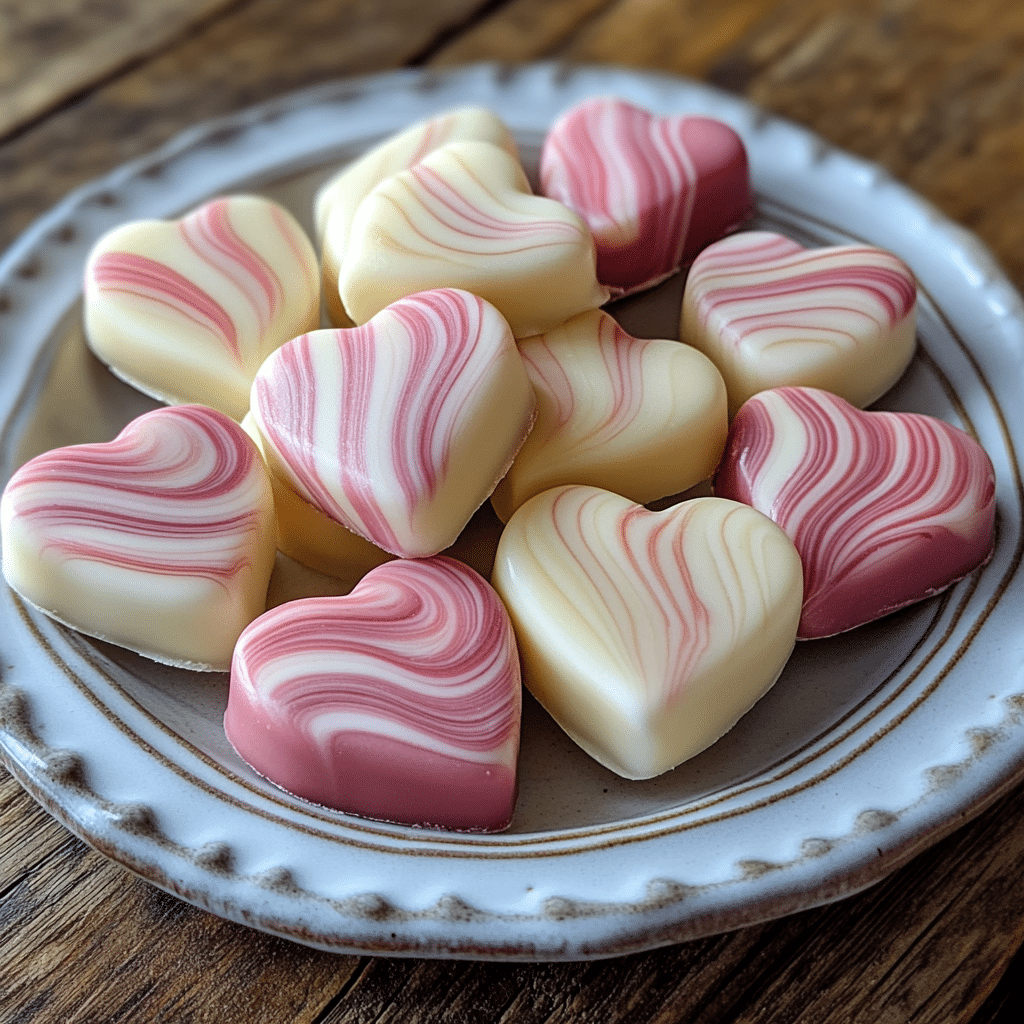
- Make them heart-shaped: If you want to emphasize the Valentine’s Day theme even more, use heart-shaped molds to give your candies a romantic touch.
- Make them dairy-free: Use a dairy-free white chocolate alternative to make these candies vegan-friendly.
How to Make the Recipe
Step 1: Prepare the Molds
Start by preparing your heart-shaped molds or any silicone molds you plan to use. If you don’t have molds, you can simply spread the melted chocolate onto a baking sheet lined with parchment paper to create candy bark.
Step 2: Melt the White Chocolate
In a microwave-safe bowl, melt the white chocolate in 30-second intervals, stirring after each, until the chocolate is completely smooth and melted. Be careful not to burn the chocolate.
Step 3: Add Food Coloring
Once the white chocolate is melted, divide it into separate bowls based on how many colors you want to use. Add a few drops of food coloring to each bowl and stir to combine. You can choose red, pink, or any other color that fits the Valentine’s Day theme.
Step 4: Swirl the Chocolate
Spoon small amounts of the different colored chocolates into your molds. Then, use a toothpick or skewer to gently swirl the colors together to create a marbled or swirled effect. Be careful not to over-mix the colors to maintain the beautiful swirl.
Step 5: Add Decorations
If desired, sprinkle some festive decorations like edible glitter, sprinkles, or a small pinch of sea salt over the swirled chocolate for extra flair.
Step 6: Let the Chocolate Set

Allow the chocolate to set in the refrigerator for about 30 minutes to 1 hour, or until it hardens completely. Once set, carefully remove the candies from the molds.
Tips for Making the Recipe
- Use good quality chocolate: The better the chocolate, the better your candies will taste. Try to use high-quality white chocolate for the smoothest texture and best flavor.
- Work quickly: Once the food coloring is added to the white chocolate, work quickly to create the swirls before the chocolate starts to harden.
- Use a clean spoon: When working with multiple colors, make sure your spoons or utensils are clean to avoid mixing colors before you’re ready.
- Don’t overheat the chocolate: When melting the chocolate, be sure to melt it slowly and in short bursts. Overheating the chocolate can cause it to seize up and become grainy.
How to Serve
These Valentine’s Day Swirled White Chocolate Candies are best served fresh and enjoyed with your loved ones. They can be served individually or arranged in a candy box or jar for a sweet gift. Pair them with a glass of milk, coffee, or even a glass of champagne for a decadent treat.
Make Ahead and Storage
Storing Leftovers
Store any leftover candies in an airtight container at room temperature for up to 1 week. If you live in a warmer climate, it’s best to store them in the refrigerator to keep the chocolate from melting.
Freezing
For long-term storage, you can freeze these candies for up to 3 months. Place them in an airtight container or freezer-safe bag, and make sure they’re not touching each other to prevent sticking.
Reheating
If your chocolates soften or lose their shape, you can gently re-melt them using the same microwave method described earlier, though this may slightly alter the texture.
FAQs
1. Can I use regular food coloring for the chocolate?
Yes, but make sure you use gel food coloring, as it won’t affect the texture of the chocolate as liquid food coloring might.
2. Can I make these candies with dark or milk chocolate?
Yes, you can substitute white chocolate for milk or dark chocolate for a different flavor.
3. Can I add other flavorings to the chocolate?
Absolutely! You can add vanilla, almond, or even raspberry extract to the melted chocolate for an extra layer of flavor.
4. How do I prevent the chocolate from getting too hard?
If you’re not ready to serve your chocolates immediately, store them at room temperature to maintain a smooth, creamy texture. Refrigeration may cause the chocolate to become too firm.
5. Can I make these candies without molds?
Yes, you can spread the melted chocolate onto parchment paper and swirl it into a fun design. Once it hardens, break it into pieces for an informal candy bark.
6. How can I add crunch to these candies?
Add crushed nuts, pretzels, or even crisped rice into the melted chocolate before it sets for some extra texture.
7. Can I make these candies in advance?
Yes, these candies can be made a few days ahead of time and stored in an airtight container.
8. How long can I store these candies?
They last for up to a week at room temperature. If stored in the fridge, they can last a bit longer.
9. Can I add sprinkles to the candies?
Yes, sprinkles are a great way to add color and extra fun to these swirled chocolates.
10. What is the best way to melt chocolate?
Use a microwave-safe bowl and heat in 30-second intervals, stirring after each to prevent burning. Alternatively, you can use a double boiler on the stove.

Conclusion
These Valentine’s Day Swirled White Chocolate Candies are the perfect treat to celebrate love in a sweet and creative way. With their vibrant swirls, smooth texture, and customizable options, they’re sure to be a hit with anyone you share them with. Whether you’re giving them as gifts or enjoying them yourself, these candies are the ideal treat to make this Valentine’s Day even more special. Try this recipe today, and indulge in a bite of happiness that’s as sweet as love itself!
Print
Valentine’s Day Swirled White Chocolate Candies
- Total Time: 45 minutes (including setting time)
- Yield: About 20-30 candies (depending on mold size)
- Diet: Vegetarian
Description
These festive, creamy white chocolate candies are swirled with vibrant red and pink colors, making them the perfect treat for Valentine’s Day! Simple to make, yet so delicious, these candies are a fun way to spread love and sweetness to everyone you care about.
Ingredients
- White Chocolate: The star of the show! Choose good quality white chocolate for a creamy, sweet base.
- Food Coloring (Red/Pink): Adds beautiful, vibrant swirls to the candies.
- Vanilla Extract: A simple addition to enhance the white chocolate’s flavor.
- Toppings (Optional): Sprinkles, crushed nuts, or sea salt to add extra texture and flair to the candies.
Instructions
- Melt the White Chocolate: Break the white chocolate into pieces and melt it gently using a double boiler or microwave (stirring every 20-30 seconds to prevent burning).
- Add Vanilla: Once the chocolate is fully melted, stir in the vanilla extract to add flavor.
- Color the Chocolate: Divide the melted white chocolate into small bowls. Add a few drops of red and/or pink food coloring to each bowl, stirring gently to create swirls of color.
- Prepare the Molds: Line a baking sheet with parchment paper or silicone candy molds.
- Pour the Chocolate: Spoon the white chocolate into the molds, alternating between the different colors to create a swirled effect. Use a toothpick or skewer to gently swirl the colors together.
- Add Toppings: If desired, sprinkle with toppings like sprinkles, crushed nuts, or sea salt.
- Set the Candies: Allow the candies to set at room temperature or refrigerate them for 30-60 minutes until firm.
- Remove from Molds: Once the chocolate has set, carefully remove the candies from the molds.
- Serve or Store: Enjoy your candies right away or store them in an airtight container at room temperature.
Notes
- Be sure to use high-quality white chocolate for the best results.
- You can mix multiple colors of food coloring for more intricate swirls.
- Keep the candies cool, as white chocolate can melt easily in warm temperatures.
- Prep Time: 10 minutes
- Cook Time: 5-10 minutes
- Category: Dessert, Candy
- Method: Melting
- Cuisine: American