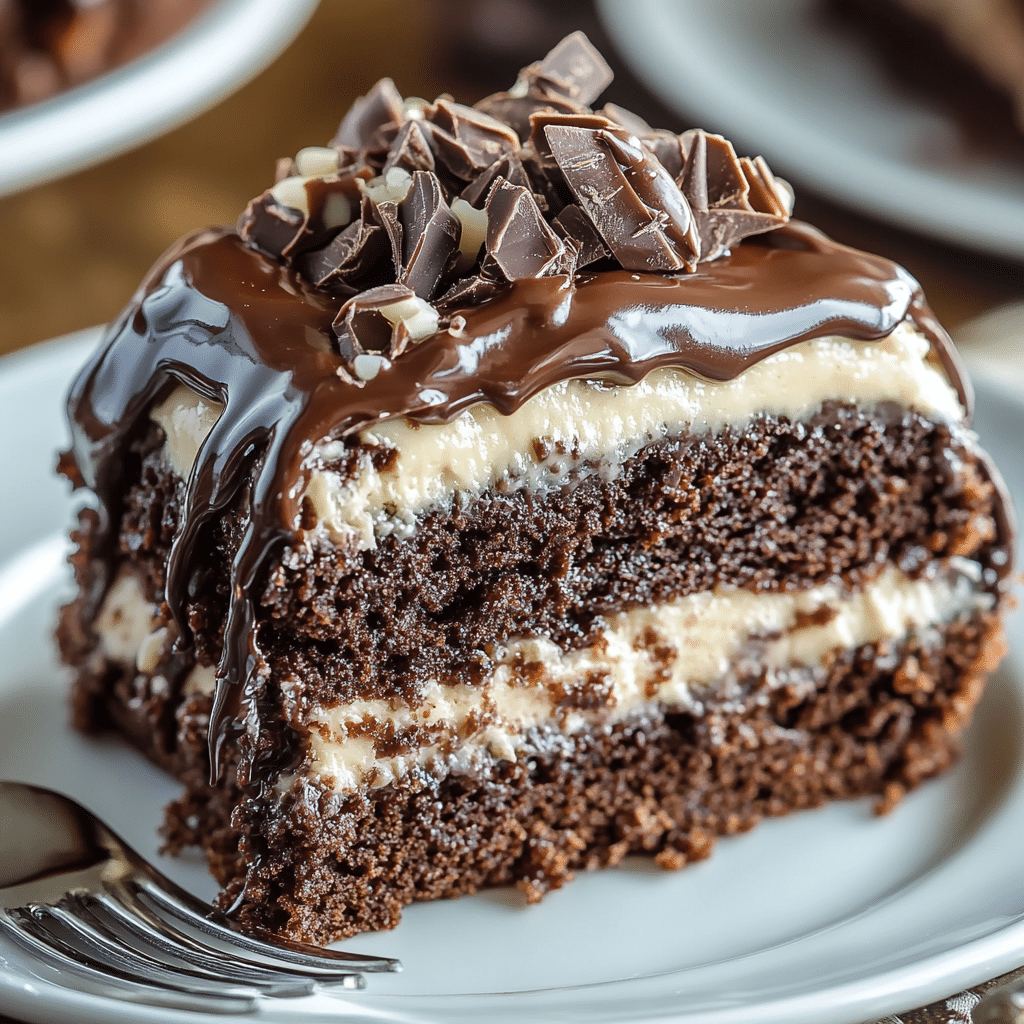
This Chocolate Turtle Cake is a decadent, easy-to-make dessert that combines all the beloved flavors of turtle candy—rich chocolate, gooey caramel, and crunchy pecans—into one irresistible cake. The moist chocolate cake serves as the perfect base for layers of sweetened condensed milk, caramel sundae topping, whipped topping, and more, creating a treat that will quickly become a favorite. With a rich, indulgent flavor and a creamy texture, this cake is sure to impress at any gathering or celebration!
Why You’ll Love This Recipe
1. Rich and Decadent
This cake has all the indulgent qualities of a traditional turtle dessert, with the addition of a soft, moist chocolate cake base. The combination of chocolate, caramel, and pecans creates a dessert that’s both rich and satisfying.
2. Quick and Easy to Make
Using a boxed chocolate cake mix, this cake comes together in no time! No need to spend hours in the kitchen—this dessert is quick, easy, and perfect for last-minute gatherings.
3. Layered with Sweetness
The layers of sweetened condensed milk, caramel sundae topping, and whipped topping create a creamy texture that perfectly complements the crunch of the chopped pecans and the sweetness of the chocolate chips.
4. Perfect for Any Occasion
Whether you’re celebrating a birthday, hosting a party, or simply treating yourself, this cake is perfect for any occasion. Its rich flavors and stunning presentation make it a showstopper dessert.
5. Turtle Candy Inspired
If you love turtle candies, this cake is the ultimate treat. It brings together all the signature flavors of a turtle candy bar in a cake form, so you can enjoy them in a new way!

Ingredients
For the Cake:
- Chocolate cake mix (Devil’s Food), 15.25-ounce box
For the Layers:
- Sweetened condensed milk, 14-ounce can
- Caramel sundae topping, 12-ounce jar
- Whipped topping (thawed), 8-ounce container
- Pecans (chopped), 1/2 cup
- Mini semi-sweet chocolate chips, 1/2 cup
- Salted caramel sauce, 1/3 cup
Variations
- Gluten-Free Option: Use a gluten-free chocolate cake mix to make this cake gluten-free. The rest of the ingredients are naturally gluten-free.
- Dairy-Free: You can substitute the sweetened condensed milk with a dairy-free alternative and use a non-dairy whipped topping to make this dessert dairy-free.
- Extra Crunch: Add more chopped pecans on top for an extra crunchy texture, or substitute them with your favorite nuts, such as walnuts or almonds.
How to Make the Recipe
Step 1: Prepare the Cake
Preheat your oven to 350°F (175°C). Prepare the chocolate cake mix according to the package instructions. Once mixed, pour the batter into a greased 9×13-inch baking dish and bake for 30-35 minutes, or until a toothpick inserted into the center of the cake comes out clean. Allow the cake to cool completely.
Step 2: Create the Caramel Layer
Once the cake has cooled, use the handle of a wooden spoon to poke holes evenly across the entire cake. Pour the sweetened condensed milk over the cake, allowing it to soak into the holes. Then, drizzle the caramel sundae topping over the cake and spread it evenly.
Step 3: Add the Whipped Topping
Spread the thawed whipped topping evenly over the cake, covering the caramel layer. Make sure the whipped topping is spread evenly to cover the entire surface.
Step 4: Add the Toppings
Sprinkle the chopped pecans and mini semi-sweet chocolate chips evenly over the whipped topping. Drizzle the salted caramel sauce over the top for an extra indulgent touch.
Step 5: Chill and Serve
Refrigerate the cake for at least 2 hours before serving. This allows the flavors to meld together and makes the cake easier to slice. Once chilled, slice the cake into squares and serve!

Tips for Making the Recipe
- Cool the Cake Completely: Make sure the cake is completely cooled before adding the layers. This ensures that the whipped topping stays firm and doesn’t melt into the cake.
- Use Room Temperature Ingredients: Make sure your whipped topping is thawed, and if using any other refrigerated ingredients, let them come to room temperature before using to ensure smooth spreading.
- Evenly Distribute the Condensed Milk: When pouring the sweetened condensed milk over the cake, be sure to evenly distribute it to ensure every bite is sweet and creamy.
- Chill for Best Texture: For the best texture, let the cake chill in the refrigerator for at least 2 hours before serving to allow all the layers to set.
How to Serve
This Chocolate Turtle Cake is perfect on its own, but you can also serve it with a scoop of vanilla ice cream or a drizzle of extra caramel sauce for even more indulgence. It pairs wonderfully with coffee, tea, or a glass of milk for the ultimate dessert experience.
Make Ahead and Storage
Storing Leftovers
Store any leftover cake in an airtight container in the refrigerator for up to 3-4 days. The cake stays fresh and delicious for a few days, and the flavors continue to meld together.
Freezing
You can freeze this cake for up to 2 months. Wrap individual slices tightly in plastic wrap and then foil before freezing. Thaw in the refrigerator before serving.
Reheating
This cake is best served cold, so there’s no need to reheat it. If you prefer a slightly softened cake, let it sit at room temperature for 10-15 minutes before serving.
FAQs
1. Can I use a different flavor of cake mix?
Yes, you can use a different flavor, such as vanilla or red velvet, but chocolate cake works best to complement the turtle candy-inspired flavors.
2. Can I use regular whipped cream instead of whipped topping?
Yes, you can use homemade whipped cream, but store-bought whipped topping gives a more stable texture for the cake.
3. Can I make this cake ahead of time?
Yes, this cake can be made up to 2 days in advance. Just store it in the fridge and chill for the best texture and flavor.
4. Can I use a different nut for the topping?
Yes, you can substitute pecans with walnuts, almonds, or any nut you prefer.
5. How do I make the cake gluten-free?
Use a gluten-free chocolate cake mix in place of the regular cake mix, and make sure all other ingredients are certified gluten-free.
6. Can I freeze this cake?
Yes, you can freeze this cake. Wrap it tightly in plastic wrap and foil and freeze for up to 2 months. Thaw in the fridge before serving.
7. Can I make this cake dairy-free?
Yes, you can use dairy-free whipped topping and a dairy-free sweetened condensed milk substitute to make the cake dairy-free.
8. How long does the cake need to chill?
Chill the cake for at least 2 hours to allow the flavors to meld and the layers to set properly.
9. Can I add more caramel?
Yes, you can add more salted caramel sauce or caramel sundae topping for an even sweeter, more decadent dessert.
10. Can I make this cake without the pecans?
Yes, you can omit the pecans or substitute them with your favorite nuts, such as almonds or walnuts, or leave them off entirely for a nut-free version.

Conclusion
This Chocolate Turtle Cake is a perfect dessert for any occasion. It’s easy to make, incredibly indulgent, and sure to satisfy any sweet tooth. With layers of chocolate, caramel, whipped topping, and crunchy pecans, it captures all the flavors of turtle candies in a cake form. Whether you’re serving it for a family gathering or enjoying it as an after-dinner treat, this cake is sure to impress!
Print
Chocolate Turtle Cake Recipe
- Total Time: 2 hours 45 minutes (including cooling and chilling time)
- Yield: 12 servings 1x
- Diet: Gluten Free
Description
A rich and indulgent dessert combining layers of moist chocolate cake, sweetened condensed milk, caramel topping, whipped topping, chopped pecans, and mini chocolate chips. A delightful treat that captures the essence of a turtle candy in cake form!
Ingredients
- 1 box (15.25 oz) Devil’s Food chocolate cake mix
- 1 can (14 oz) sweetened condensed milk
- 1 jar (12 oz) caramel sundae topping
- 1 container (8 oz) whipped topping, thawed
- ½ cup chopped pecans (Fisher)
- ½ cup mini semi-sweet chocolate chips
- ⅓ cup salted caramel sauce
Instructions
-
Prepare the Cake:
- Preheat the oven to 350°F (175°C).
- Prepare the chocolate cake mix according to the instructions on the box (usually with water, eggs, and oil).
- Pour the batter into a greased 9×13-inch baking dish and bake according to the package instructions (typically around 30-35 minutes or until a toothpick inserted into the center comes out clean).
-
Prepare the Toppings:
- Once the cake is done baking, remove it from the oven and let it cool for about 10 minutes.
- Use a fork to poke several holes in the cake while it’s still warm.
-
Add the Sweetened Condensed Milk:
- Pour the sweetened condensed milk evenly over the top of the warm cake, allowing it to soak into the holes. Let the cake cool completely.
-
Add the Caramel and Whipped Topping:
- Drizzle the caramel sundae topping over the top of the cake, spreading it out evenly.
- Spread the thawed whipped topping evenly over the cake.
-
Add the Pecans and Chocolate Chips:
- Sprinkle the chopped pecans and mini semi-sweet chocolate chips over the whipped topping layer for added crunch and sweetness.
-
Drizzle with Salted Caramel Sauce:
- Drizzle the salted caramel sauce over the top of the cake for an extra touch of caramel flavor.
-
Chill and Serve:
- Refrigerate the cake for at least 2 hours before serving to let the flavors meld together and allow the topping to set.
- Slice and enjoy!
Notes
- For best results, allow the cake to cool completely before adding the condensed milk to ensure proper soaking.
- You can substitute the salted caramel sauce with regular caramel if preferred.
- This cake is best served chilled, so the topping remains firm and delicious.
- Prep Time: 15 minutes (not including cooling time)
- Cook Time: 30-35 minutes (baking time)
- Category: Dessert
- Method: Baked
- Cuisine: American