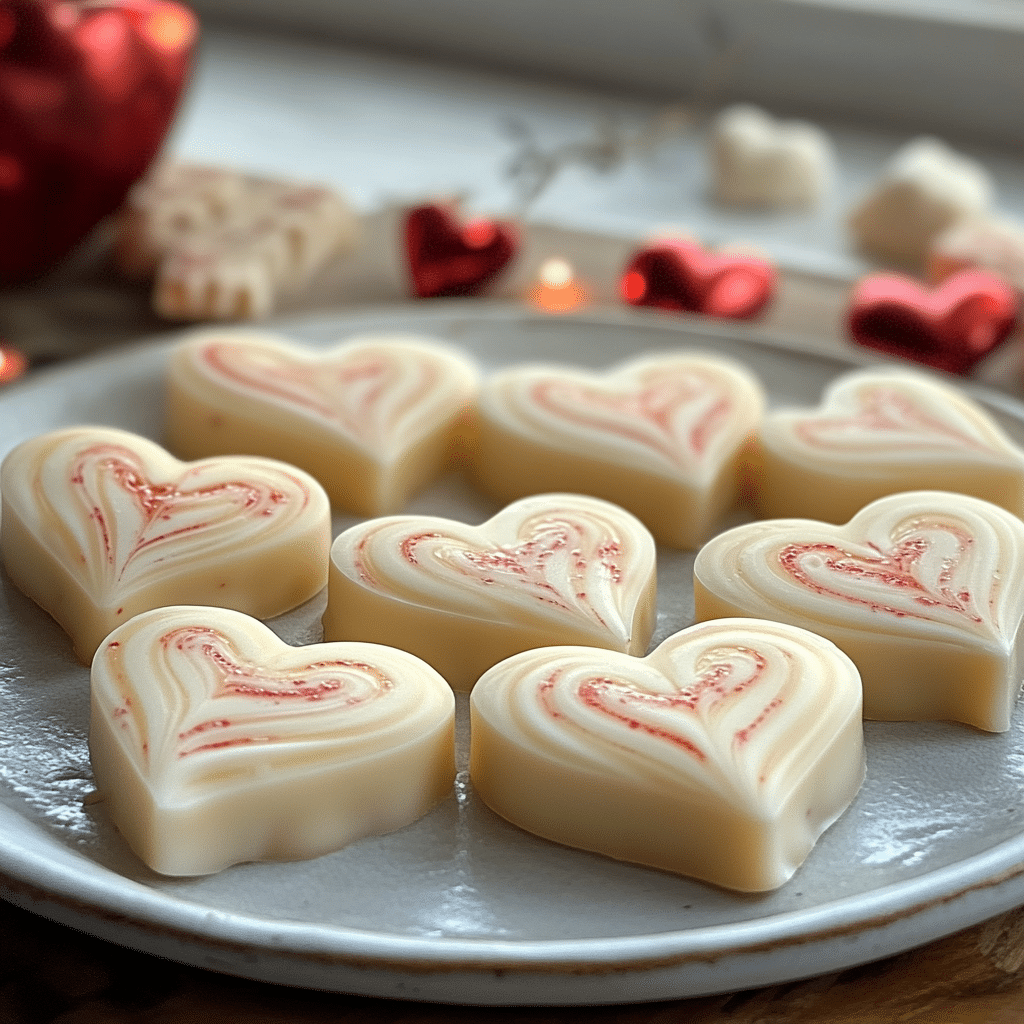
Valentine’s Day Swirled White Chocolate Candies are a delightful treat that combines the richness of white chocolate with the festive spirit of Valentine’s Day. These swirled candies are not only irresistibly sweet but also visually stunning with their beautiful marbled appearance. The simple combination of white chocolate and vibrant red or pink swirls makes them an excellent choice for Valentine’s Day gifts, party favors, or just a fun homemade treat to share with loved ones. These candies are easy to make, require minimal ingredients, and will surely add a sweet touch to your celebration.
Whether you’re making them for a romantic evening, a family get-together, or simply to enjoy with friends, these swirled white chocolate candies are as fun to make as they are to eat. The vibrant colors and smooth texture make them the perfect addition to your Valentine’s Day festivities!
Why You’ll Love This Recipe
1. Beautifully Festive
The swirled design and vibrant red or pink colors make these candies perfect for celebrating Valentine’s Day in style. They add a playful and elegant touch to any celebration.
2. Easy to Make
With just a few simple ingredients and minimal preparation, these swirled candies are quick and easy to whip up. You don’t need to be a seasoned baker to create these visually stunning treats.
3. Customizable
You can customize the colors to suit your preferences. Choose from shades of red, pink, or even purple to make the candies as festive and personalized as you like.
4. Perfect for Gifting
These swirled candies are an ideal homemade gift for loved ones. Package them in clear bags tied with ribbons for a thoughtful and sweet treat that’s sure to bring a smile to anyone’s face.
5. Decadent and Delicious
The smooth, creamy white chocolate paired with the subtle swirl of color makes these candies a rich and satisfying treat. Their melt-in-your-mouth texture will leave everyone wanting more!

Ingredients
- White chocolate chips or white chocolate bars (broken into pieces)
- Red or pink candy melts (or food coloring if preferred)
- Edible glitter or sprinkles (optional, for added decoration)
- Heart-shaped candy molds or silicone molds (optional)
Variations
- Add Flavors: You can enhance the flavor of the white chocolate by adding a drop of vanilla extract, almond extract, or any other flavoring you love.
- Add Toppings: For extra texture, sprinkle crushed nuts, mini marshmallows, or small candies into the melted chocolate before it hardens.
- Use Dark Chocolate or Milk Chocolate: For a different look and taste, use dark chocolate or milk chocolate instead of white chocolate.
- Add Sprinkles: For extra fun, sprinkle colorful or heart-shaped sprinkles on top before the chocolate sets for an added festive touch.
How to Make the Recipe
Step 1: Prepare the Molds
If you’re using heart-shaped molds or any other shape, make sure they are clean and dry before beginning. You can also line a baking sheet with parchment paper if you prefer to make freeform shapes.
Step 2: Melt the White Chocolate
Place the white chocolate chips or broken white chocolate bars in a microwave-safe bowl. Microwave in 30-second intervals, stirring in between, until the chocolate is fully melted and smooth. Be careful not to overheat the chocolate.
Step 3: Melt the Red or Pink Candy Melts
In a separate microwave-safe bowl, melt the red or pink candy melts or use a few drops of food coloring to achieve the desired shade of pink or red. Again, microwave in 30-second intervals, stirring in between, until the candy melts are smooth.
Step 4: Swirl the Chocolate
Spoon the melted white chocolate into the molds, filling each mold about halfway. Next, drizzle the melted red or pink candy melts on top of the white chocolate. Use a toothpick, skewer, or small spatula to swirl the two chocolates together, creating a beautiful marbled effect.
Step 5: Let the Candies Set
Place the molds in the refrigerator for about 20-30 minutes, or until the chocolate has fully set and hardened. If you’re using parchment paper, simply let the candies sit at room temperature to harden.
Step 6: Pop the Candies Out of the Molds
Once the chocolate has hardened, carefully pop the candies out of the molds. If you used parchment paper, simply break the chocolate into pieces. If desired, decorate with edible glitter or sprinkles for an extra festive touch.

Tips for Making the Recipe
- Work Quickly: Once the chocolates are melted, work quickly to swirl them together before they begin to harden. If needed, you can reheat the chocolates slightly to maintain their smooth consistency.
- Don’t Overheat: Be cautious when melting white chocolate as it can burn easily. Heat in short intervals and stir regularly to ensure it melts evenly.
- Add Color Gradually: If you’re using food coloring, start with a small amount and add more until you reach your desired shade. It’s easier to add more than to remove excess coloring.
- Use a Toothpick or Skewer: For the best swirling effect, use a toothpick or skewer to swirl the chocolate. This will help you create that beautiful marbled pattern.
How to Serve
These Valentine’s Day Swirled White Chocolate Candies are perfect for serving as party favors or dessert at your Valentine’s Day gathering. Arrange them on a decorative platter or in small gift boxes tied with ribbons. They also make a great addition to Valentine’s Day gift baskets. For a cute presentation, serve them alongside other Valentine’s Day treats such as heart-shaped cookies or chocolates.
Make Ahead and Storage
Storing Leftovers
Store any leftover swirled white chocolate candies in an airtight container at room temperature for up to 1 week. Be sure to keep them in a cool, dry place away from direct sunlight.
Freezing
If you want to store them for a longer period, place the candies in an airtight container or freezer-safe bag and freeze them for up to 3 months. Let them thaw at room temperature before serving.
Reheating
Since these candies are already set and hard, there is no need to reheat them. Simply enjoy them as is once they are fully set.
FAQs
1. Can I use milk chocolate or dark chocolate instead of white chocolate?
Yes, you can substitute milk chocolate or dark chocolate for a different flavor, but it may not have the same bright, festive appearance as white chocolate.
2. How can I make sure the chocolate sets properly?
Allow the chocolate to harden at room temperature or in the refrigerator. The colder the environment, the faster it will set.
3. Can I make these candies without molds?
Yes, you can simply drizzle the swirled chocolate onto a baking sheet lined with parchment paper and allow it to set in freeform shapes.
4. Can I use gel food coloring instead of candy melts?
Yes, you can use gel food coloring, but keep in mind that it might require a bit more effort to mix it into the chocolate. Be sure to add it gradually to avoid affecting the consistency of the melted chocolate.
5. How long do these candies stay fresh?
Stored properly in an airtight container, they will stay fresh for up to 1 week at room temperature.
6. Can I add other flavors to the chocolate?
Yes! You can add extracts like vanilla, almond, or mint to the white chocolate for added flavor.
7. How can I make the swirls more vibrant?
To get more vibrant swirls, use candy melts or add more food coloring to your chocolate mixture. Swirl quickly to avoid losing the color vibrancy.
8. Can I use a different type of mold?
Yes, you can use any shape mold you prefer. Heart-shaped molds are perfect for Valentine’s Day, but feel free to experiment with other fun shapes.
9. Can I add sprinkles to the candies?
Yes, sprinkles or edible glitter can be added right after the swirled chocolate has been placed in the molds, while it’s still slightly soft but not completely set.
10. Can I use white chocolate chips instead of bars?
Yes, white chocolate chips work well, but they may require a little more attention when melting, as they tend to be thicker.

Conclusion
These Valentine’s Day Swirled White Chocolate Candies are an easy and visually stunning treat that will add a touch of sweetness to your Valentine’s Day celebrations. Whether you’re making them for a special someone, as a gift, or for a festive party, they’re sure to be a hit. The combination of creamy white chocolate and vibrant swirls creates a delightful treat that looks as good as it tastes. So, grab your molds, get swirling, and enjoy making these fun and festive candies!
Print
Valentine’s Day Swirled White Chocolate Candies Recipe
- Total Time: 45 minutes (includes chilling)
- Yield: 12–15 pieces (depending on size) 1x
- Diet: Vegetarian
Description
These Valentine’s Day Swirled White Chocolate Candies are a fun and festive treat for the holiday! With a smooth white chocolate base and vibrant swirls of pink and red candy melts, these candies are perfect for gifting or enjoying with loved ones. Simple to make and packed with sweet, creamy flavor, they’re a great addition to any Valentine’s Day celebration!
Ingredients
- 1 1/2 cups white chocolate chips (or white chocolate melting wafers)
- 1/4 cup red candy melts
- 1/4 cup pink candy melts
- 1 teaspoon coconut oil or vegetable oil (optional, for smoother melting)
- Valentine’s Day sprinkles (optional, for decoration)
- Parchment paper (for lining)
Instructions
- Prepare the Baking Sheet:
Line a baking sheet with parchment paper and set aside. - Melt the White Chocolate:
Place the white chocolate chips in a microwave-safe bowl. Microwave in 30-second intervals, stirring in between, until fully melted and smooth. If the chocolate is too thick, stir in 1 teaspoon of coconut oil or vegetable oil to thin it out. - Melt the Candy Melts:
In two separate bowls, melt the red and pink candy melts using the same method. Stir well until smooth and glossy. - Create the Swirl Effect:
Pour the melted white chocolate onto the prepared parchment paper and spread it into an even layer. Then, drop spoonfuls of the red and pink melted candy onto the white chocolate. Use a toothpick or skewer to gently swirl the colors together, creating a marbled effect. - Add Decorations:
While the chocolate is still soft, sprinkle with Valentine’s Day-themed sprinkles like heart-shaped confetti, glitter, or colored sugar crystals. - Chill to Set:
Place the baking sheet in the refrigerator for 30-45 minutes, or until the chocolate has completely set and hardened. - Break or Cut into Pieces:
Once set, break the swirled chocolate into bite-sized pieces or cut into fun shapes using a sharp knife. - Serve and Enjoy:
Serve these colorful and creamy candies as a Valentine’s Day treat or package them in gift bags for a sweet gift.
Notes
- You can adjust the colors of the candy melts to fit your theme, such as using purple or gold for other holidays.
- Store in an airtight container at room temperature for up to 1 week.
- If you’d like to make a larger batch, you can double the ingredients.
- Prep Time: 10 minutes
- Cook Time: 5-10 minutes (melting time)
- Category: Candy, Dessert, Valentine’s Day
- Method: Melting, Swirling
- Cuisine: American